
Instruction Manual
A comprehensive guide on operating, caretaking, and maintaining your genuine BINA harmonium.
Download PDF Instruction Manual
Get a printer-friendly version of the official BINA Harmonium Instruction Manual to keep as a handy guide in your instrument case.
Download PDF VersionWelcome
Introduction
Congratulations on your fine choice! You are now a proud owner of a quality, genuine BINA musical instrument.
BINA products are famous for their tonal quality as well as their reliability. BINA MUSICAL STORES was established over five decades ago, and has since then become the largest manufacturing and exporting house of premium musical instruments in India – a result of our constant endeavour to offer superior value and commitment to the discerning musician.
Being the pioneers in the art of making the Harmonium, because of which BINA is a household name in select music circles, we have diversified, and can now boast of an impressive array of musical instruments in our product line. The name BINA assures you of excellent quality and constant effort to exceed customer expectations.
Acoustics
General Information
The harmonium is a very useful and all pervading accompanying acoustic keyboard. It is basically western in origin and entered India along with British rule, but the Indian Harmonium is now the sole survivor from its family that is being manufactured and used in a major way.
It fits admirably in the Indian style of music rooted in melody of notes owing to its infinite adaptability and range of adjustments despite its limitation of having only fixed notes. BINA Harmoniums are made from high quality seasoned wood.
Anatomy Of Sound
Parts of a Harmonium
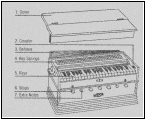 Bina Harmonium Structural Diagram
1The Cover
A wooden plane placed over the keys and springs to prevent dust from entering. Most models come with a cover.
2Coupler (Octave Function)
Allows double key function. Automatically presses the key of the adjacent octave when any key is pressed.
3Bellows
Collapsible cardboard enclosures on the back that pump air into the reed banks to produce sound.
4Key Springs
Springs positioned beneath each key to keep them in their normal, upright resting position.
5Keyboard
The black and white keys arrayed across the front panel representing Indian classical and Western notes.
6Large Stop Knobs
Stops fitted in front that control the overall airflow into the reed banks. Positioned as per desired sound volume.
7Smaller Drone Knobs
Control the drone notes (continuous sustained pitches) that accompany the lead melody notes.
8The Reed Board
Hidden under the keys. The main board where keys are set, with chambers beneath where reeds are securely affixed.
Models & Designs
Types of Harmonium
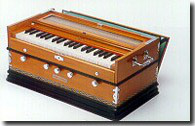
Standard Harmonium
The basic form of the harmonium. Built with a solid, stationary outer chassis, optimal for home practice and permanent installations.
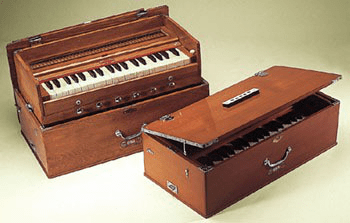
Portable Harmonium
A standard harmonium constructed to settle down neatly into a hollow wooden cavity that closes securely to form a convenient suitcase shape for travel.
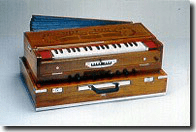
Scale Changer
The key mechanism sits on a sliding plate. The entire keyboard slides horizontally, allowing the musician to shift scales across 9, 11, or 13 keys dynamically.
Types of Bellows
Single-Fold Bellow
Basic bellows providing single directional compression control.
Double-Fold Bellows
Dual fold bellows yielding steady airflow to the internal chamber.
Triple-Fold Bellows
Higher capacity folds ensuring full pressure for classic styles.
Multi-Fold Bellows
Accordion-like multiple folds giving the most responsive air pressure control.
Types of Couplers
Standard Coupler Option
Comes fitted in most models. This coupler is operated via a lever fixed to the right of the keyboard. Positioned up to engage (ON) and down to disengage (OFF).
Scale Changer Coupler
Coupler is fitted on the front panel with the stop knobs (the stop knob to the right or left and slightly higher than others). Pushed in to engage (ON) and pulled out to disengage (OFF).
Air Valves & Drones
Function of Stops
Knobs located in front control the airflow to the reed chambers. Here is the configuration of stop knobs for our main harmonium models.
Models 9, 17s, 23 B 3 ½, & Sangeet (9 Stops)
- 1. Male reeds
- 2. Drone
- 3. Bass reeds
- 4. Drone
- 5. Bass reeds
- 6. Drone
- 7. Tremolo
- 8. Drone
- 9. Male reeds
Models 8, 11, & 12 (7 Stops)
- 1. Male reeds
- 2. Drone
- 3. Bass reeds
- 4. (Reserved for Tremolo / Drone)
- 5. Bass reeds
- 6. Drone
- 7. Tremolo
Models 5, 10, & Bina Tarang (5 Stops)
- 1. Male reeds
- 2. Bass reeds
- 3. Drone
- 4. Bass reeds
- 5. Tremolo
Model 23 B 2 ½ Octave (4 Stops)
- 1. Male reeds
- 2. Bass reeds
- 3. Drone
- 4. Drone
Model 23 B (6 Stops)
- 1. Male reeds
- 2. Bass reeds
- 3. Bass reeds
- 4. Tremolo
- 5. Drone
- 6. (Reserved for Drone / Reeds)
Models 9, 17s, 23 B 3 ½, & Sangeet (Alternative Stop Config)
- 1. Male reeds
- 2. Female reeds
- 3. Drone
- 4. Bass reeds
- 5. Drone
- 6. Male reeds
- 7. Drone
- 8. Tremolo
- 9. Drone
Sizes of Harmoniums
Play Guide
Operating Instructions
Remove Cover / Unfold
Remove the cover of standard harmonium or pull out the folded chassis portion for portable harmoniums.
Open the Bellows
Unclip the bellow lock tags to release the folds, allowing them to expand and retract for air collection.
Pull Out Stops
Pull out the stop knobs at the front as per the required volume level or specific tone desired.
Finger Placement
Place your fingers on the keyboard before pumping air through the bellows to prevent excessive chamber pressure.
Release Air After Playing
Clip the bellows shut. Press down multiple keys together to release remaining air from the bellows and reed chambers.
Close All Stops
Push all stop knobs back into the front panel to keep dust out and secure the slide valves.
Instrument Longevity
Care & Maintenance
Avoid Damp Places
Never store the harmonium in damp or humid places to protect wood and cardboard integrity.
Temperature Exposure
Avoid exposure to high temperatures and direct sunlight to prevent wood warping and tuning drift.
Bellows Safety
Never insert anything in the air holes at the back of the bellows to avoid tearing the inner valves.
No Dry Air Blows
Never pump air into the harmonium without having pulled out any stops to prevent internal box pressure damage.
Compress Fully
Always remove all air from bellows and release the pressure before locking the bellows shut.
Cover Post-Play
Always cover your harmonium after playing or when storing it to protect keys from dust settling.
Coupler Handling
Never change the coupler lever position while actively pressing down keys to prevent spring bends.
No Harsh Chemicals
Do not use lacquer, thinner, or similar abrasive chemicals for cleaning. Use a dry, soft microfiber cloth.
Regular Usage is Key
Regular play is the best maintenance. Extended storage causes sticky keys, detuning, and bellows dry-rot.
Melodious Journeys Ahead
Once again, we thank you for choosing a BINA Harmonium and wish you years of melodious playing, and assure you of any assistance you might ever require.